Calathea, with its striking foliage and vibrant patterns, is a favorite among plant lovers looking to add a touch of the tropics to their homes. While these beauties can sometimes be a bit demanding, they make up for it with their eye-catching leaves and the joy they bring once you get their care just right. If you're looking to expand your collection without buying more plants, propagating your Calathea in water is a fun and rewarding project.
In this article, we're going to explore everything you need to know about propagating Calathea in water. From selecting the right tools and preparing your plant to nurturing the new growth, we've got you covered. So, grab a cup of tea, settle into your favorite chair, and let's get started on creating more green magic in your home.
Getting to Know Your Calathea
Before you begin the propagation process, it's helpful to understand a bit more about your Calathea's nature. Calatheas are known for their bold and beautiful leaves, which often feature intricate patterns in shades of green, purple, pink, and even silver. They're native to tropical regions, so they thrive in warm, humid environments.
One of the quirks of Calathea is their sensitivity to their surroundings. They don't like direct sunlight, preferring bright, indirect light instead. Too much sun can scorch their leaves, while too little can dull their vibrant colors. They're also quite particular about moisture. The soil needs to stay moist but not soggy, which can sometimes feel like a balancing act, especially if you're new to plant care.
Interestingly enough, Calatheas are also known as "prayer plants" because their leaves move up and down in response to light—a phenomenon known as nyctinasty. This can be a delightful feature as you watch your plant "dance" throughout the day.
Why Propagate in Water?
Propagating Calathea in water might seem unconventional at first, especially since many plant people prefer soil propagation. However, water propagation has its own set of advantages, especially for a plant like Calathea. First, it's much easier to monitor root development when they're in water. You can watch the roots grow daily, giving you a clear indication of how well the propagation is going.
Another benefit is that water propagation can sometimes be more forgiving. It reduces the risk of overwatering or underwatering—a common issue for Calathea. Plus, it's a cleaner process. You won't have to deal with the mess of soil or worry about pests hiding in the dirt.
Lastly, it can be quite rewarding to see your new plantlet thrive in water. There's something magical about watching roots develop and leaves unfurl when suspended in a simple glass jar or vase. It's a beautiful reminder of nature's wonders, right on your windowsill.
Gathering Your Supplies
Before you start, you'll need to gather a few basic supplies to ensure a smooth propagation process. Fortunately, most of these items are things you probably already have at home:
- Sharp, clean scissors or pruning shears: You'll need these to make clean cuts on your plant. A clean cut helps prevent infection or damage to the plant.
- A clear glass jar or vase: This will hold your water and the cuttings. A clear container allows you to monitor root growth easily.
- Filtered or distilled water: Calatheas are sensitive to chemicals in tap water, like chlorine and fluoride. Using filtered or distilled water will prevent potential damage to your new plant.
- Rooting hormone (optional): While not necessary, a rooting hormone can help speed up the root development process.
- Paper towels or a clean cloth: These will be handy for wiping down your tools and cleaning up any plant sap.
Having these supplies ready will make the process more efficient and enjoyable. Once you've gathered everything, it's time to move on to the next step.
Choosing the Right Time and Plant
Timing can play a crucial role in the propagation process. While you can technically propagate Calathea any time of year, doing so during the plant's active growing season—spring and summer—tends to yield better results. During these months, the plant is naturally more inclined to grow, making it more responsive to propagation efforts.
When it comes to choosing the right plant, pick one that's healthy and robust. Avoid plants that are showing signs of stress, such as yellowing leaves or stunted growth. A thriving plant will have a better chance of producing healthy cuttings that root successfully.
Look for a stem with a few healthy leaves and a node, which is where the roots will eventually grow. If you're unsure where to cut, look for a point on the stem where leaves or branches emerge. This is usually where you'll find a node.
By selecting the right time and plant, you're setting yourself up for a successful propagation experience. Now, let's move on to the fun part—actually taking your cuttings.
Making the Cut
Making the first cut can feel a bit intimidating, but with the right technique, it's a straightforward process. Here's how to do it:
- Sanitize your tools: Before making any cuts, sterilize your scissors or pruning shears with rubbing alcohol. This prevents the spread of bacteria or diseases.
- Identify the right spot: Look for a healthy stem with a node. The node is crucial as it's where the roots will develop.
- Make a clean cut: Cut just below the node, ensuring you have at least one or two leaves on the cutting. A clean cut minimizes damage to both the parent plant and the cutting.
- Optional: Use rooting hormone: If you choose to use rooting hormone, dip the cut end into the hormone powder before placing it in water.
Once you've made your cut, you’re ready to start the propagation process. Remember, making a clean cut and using sanitized tools increases the likelihood of successful propagation, so don't rush this step.
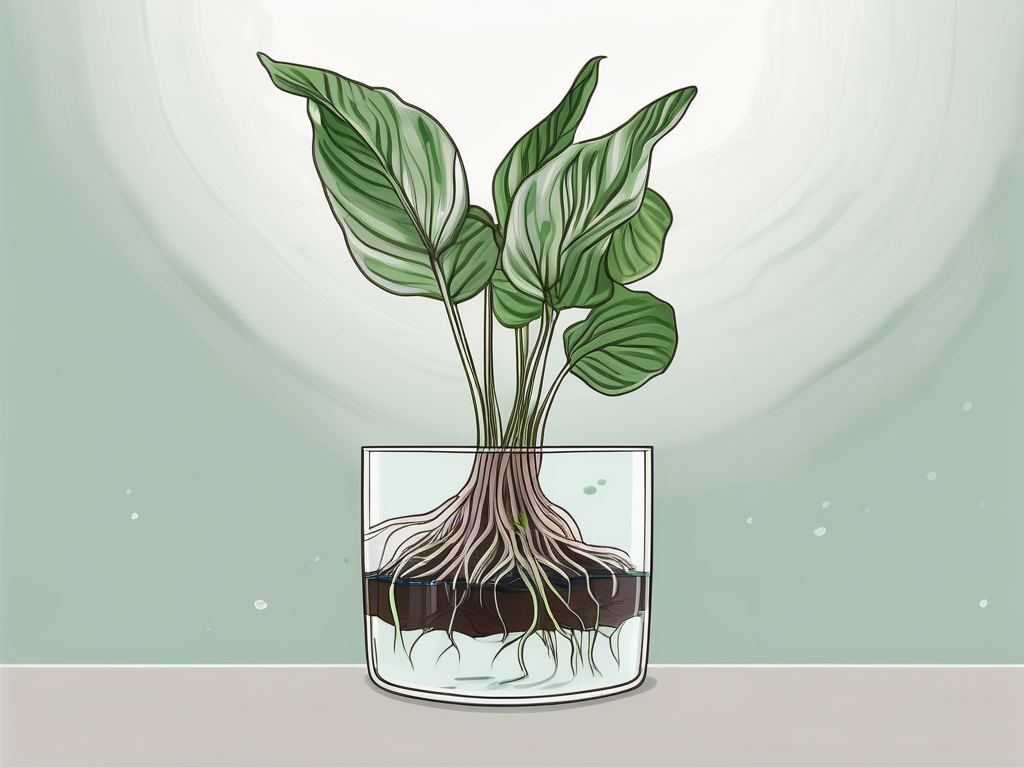
Setting Up Your Water Propagation Station
Now that you have your cuttings, it's time to set them up for success in their new watery home. Here's how:
- Fill your container: Add filtered or distilled water to your glass jar or vase. You want enough water to cover at least the node, but not so much that it submerges the leaves.
- Place the cutting: Gently place the cutting into the water, ensuring the node is submerged. If necessary, remove any leaves that might be underwater, as they can rot and affect the cutting.
- Find the right spot: Position the jar in a spot with bright, indirect light. Direct sunlight can be too harsh and may cause algae to grow in the water.
- Change the water regularly: To keep the water fresh and oxygenated, change it every week or so. This helps prevent bacteria build-up and keeps your cutting healthy.
By setting up a dedicated space for your water propagation, you're creating an environment where your Calathea cuttings can thrive. Keep an eye on the water level and quality, and you'll soon see new roots begin to form.
Monitoring Growth and Development
Patience is a virtue when it comes to propagation. While some plants root quickly, Calathea might take a little extra time. Here's what to watch for as your cutting develops:
- Root growth: After a few weeks, you should start to see small roots emerging from the node. This is a good sign that your cutting is taking to its new environment.
- Leaf changes: Some leaf yellowing might occur as the cutting redirects energy to root development. As long as the cutting remains firm, this is usually normal.
- New growth: Once roots are established, you may notice new leaves starting to unfurl. This indicates that the cutting is ready to transition to soil.
Monitoring your cutting not only keeps you engaged in the process but also allows you to intervene early if something seems off. Remember, each plant is unique and may progress at its own pace.
Transferring to Soil
Once your Calathea cutting has developed a healthy root system, it's time to transfer it to soil. This step is crucial for long-term growth and health. Here’s how to do it:
- Select the right soil: Use a well-draining potting mix. You can mix in some perlite or orchid bark to improve aeration.
- Choose the right pot: A small pot with drainage holes is ideal. This allows excess water to escape, preventing root rot.
- Prepare the pot: Add a layer of soil at the bottom of the pot, then gently place the cutting in the center.
- Backfill with soil: Carefully fill in around the roots with more soil, being cautious not to compact it too much.
- Water lightly: Give the newly potted plant a light watering to help settle the soil. Ensure the pot drains well.
- Acclimate the plant: Place the pot in a spot with bright, indirect light. Gradually increase the light exposure as the plant acclimates to soil.
Transitioning your Calathea from water to soil is a significant milestone. With the right care, your new plant will continue to grow and thrive, adding beauty to your home.
Troubleshooting Common Issues
Propagation can sometimes come with challenges. Here are a few common issues and how to address them:
- Root rot: If the roots turn mushy, it may be due to stagnant water. Change the water more frequently and ensure the node isn’t too deeply submerged.
- Leaf yellowing: Some yellowing is normal, but excessive yellowing might indicate a problem. Check for pests or adjust the light exposure.
- Slow growth: If progress seems stagnant, consider adjusting the environmental conditions, such as light and temperature.
Don't be discouraged by setbacks. Sometimes, propagation requires a bit of experimentation and trial and error. With persistence, you can overcome these hurdles and enjoy the fruits of your labor.
Enjoying Your New Calathea
Once your propagated Calathea is settled into its new pot, take time to appreciate your handiwork. You've successfully multiplied your plant collection, bringing more of these stunning beauties into your home.
As your new plant grows, continue to care for it as you would any Calathea. This includes regular watering, maintaining humidity, and providing bright, indirect light. You might even find that your new plant develops its own unique characteristics, adding variety to your existing collection.
And who knows? Maybe this won't be your last propagation project. With a little practice, you'll become a pro at growing your plant family, one cutting at a time.
Final Thoughts
Propagating Calathea in water can be a delightful way to expand your plant collection while developing your plant care skills. By understanding your plant's needs and giving it the right conditions, you can successfully nurture new growth and enjoy the satisfaction of having raised a healthy new plant.
At Cafe Planta, we're passionate about helping you care for your plants. Whether you're looking for new additions to your collection or have questions about plant care, we're here to help. Feel free to email us or reach out on Instagram. We're excited to support you on your plant journey and help you create a thriving, beautiful home. Happy planting!


