If you've been bitten by the plant bug, you're probably already familiar with the soothing charm of aloe vera. With its thick, fleshy leaves and soothing gel, aloe vera is a favorite among plant parents. But did you know you can propagate your aloe vera in water? It's a neat trick for plant lovers who enjoy watching new roots dance around in a glass jar.
In this article, we'll walk you through the process of propagating aloe vera in water. From selecting the perfect leaf to setting up the right environment for your plant to thrive, we've got you covered with tips, tricks, and a splash of humor to keep things interesting.
Understanding Aloe Vera Propagation
Aloe vera is a succulent plant famous for its medicinal properties and ease of care. While it's typically grown in soil, propagating it in water is a fun and rewarding way to expand your plant collection. Propagation is simply the process of creating new plants from existing ones, and aloe vera is particularly cooperative in this regard.
When you propagate aloe vera in water, you get a front-row seat to the fascinating process of root development. It's like having a mini science experiment right on your windowsill. The key to success in propagating aloe vera lies in selecting a healthy leaf and providing the right conditions for root growth. But don't worry, we'll guide you through each step with care and clarity.
Choosing the Right Leaf
The journey to a new aloe plant begins with selecting the right leaf. Look for a mature, healthy leaf that is free from damage or disease. Ideally, the leaf should be thick and fleshy, as this indicates a healthy storage of water and nutrients.
Steps to Choose a Leaf:
- Inspect the Plant: Choose a leaf from the outer section of the plant, as these are usually the oldest and most robust. Avoid leaves that are blemished, discolored, or have signs of rot.
- Consider the Size: A larger leaf provides more surface area for root development, increasing your chances of successful propagation.
- Check for Pups: If your plant has small offshoots, known as pups, consider removing these instead. Pups are already predisposed to grow into new plants.
Once you've selected your leaf, it's time to make the cut. Use a clean, sharp knife to cut the leaf as close to the base as possible. A straight, clean cut minimizes damage and helps the leaf recover more quickly.
Preparing the Leaf for Water Propagation
After cutting your leaf, it's important to let it dry out for a few days. This process, known as 'callusing', helps the cut end to heal and reduces the risk of rot when placed in water.
Steps to Prepare the Leaf:
- Allow it to Callus: Place the cut leaf in a dry, warm area away from direct sunlight. Let it sit for 3-5 days until the cut end forms a callus.
- Check the Callus: The callus should feel dry and firm to the touch. If the cut end is still moist, give it another day or two.
Patience is key here. Rushing this step can lead to a soggy, unhappy leaf, which is the last thing you want.
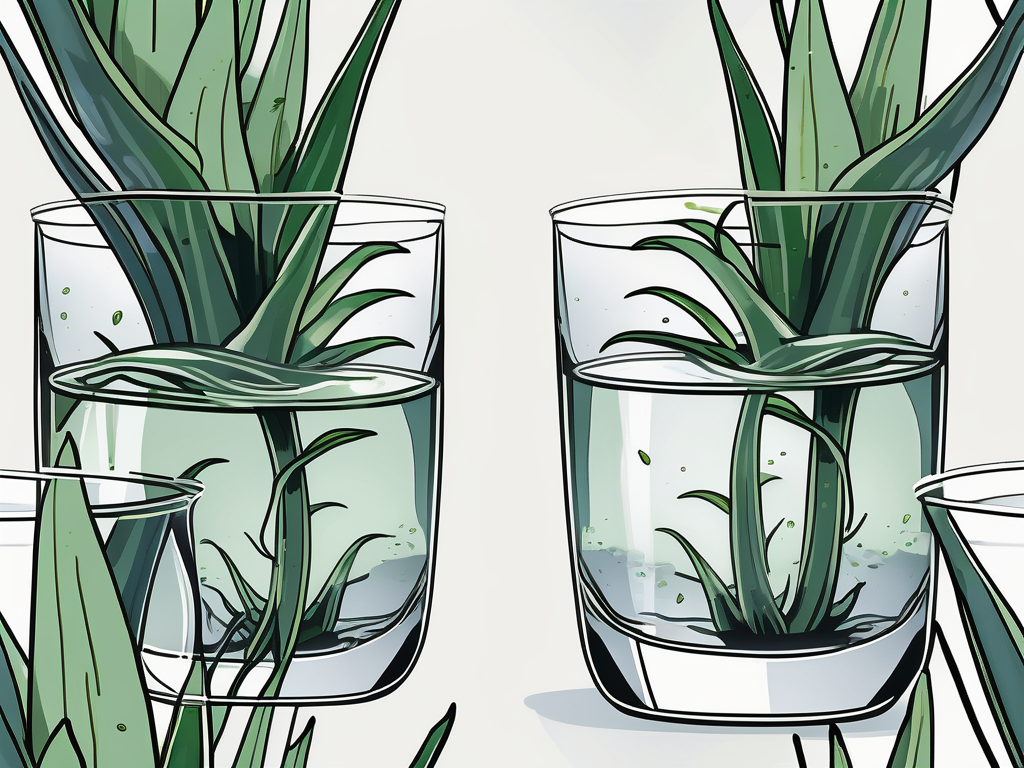
Setting Up the Water Environment
Once your leaf is callused, it's time to set up its new watery home. The goal is to provide a stable, supportive environment where your leaf can focus on growing roots.
Steps to Set Up the Environment:
- Choose a Container: Select a clear glass container so you can easily monitor root growth. Ensure it's deep enough to support the leaf upright without submerging it completely.
- Add Water: Fill the container with just enough water to cover the base of the leaf. Avoid submerging more than a quarter of the leaf to prevent rot.
- Position the Leaf: Secure the leaf in place, possibly using pebbles or marbles to stabilize it. The leaf should be upright with the cut end submerged in water.
Now, all you need to do is find a sunny spot for your container. A windowsill with indirect sunlight works well. Direct sunlight can be too harsh and might heat the water, which isn't ideal for root growth.
Monitoring and Maintaining Your Propagation
With your aloe vera leaf nestled in its watery home, the next step is to monitor and maintain the environment. This part is crucial, as neglect can lead to waterborne diseases or rot.
Steps to Monitor and Maintain:
- Change the Water Regularly: Swap out the water every week to keep it fresh and oxygenated. Stale water can harbor bacteria and discourage root growth.
- Watch for Root Growth: Keep an eye out for tiny roots emerging from the base of the leaf. This can take a few weeks, so don't panic if nothing happens right away.
- Check for Rot: If you notice a foul smell or the base of the leaf turns mushy, remove it from the water and let it dry out for a day or two before trying again.
It's a bit like babysitting, but without the diapers. Consistency is key, and your patience will pay off in the form of new roots.
Transferring to Soil
Once your aloe vera leaf has developed a healthy root system, it's time to transfer it to soil. This transition is an exciting step towards nurturing a full-grown plant.
Steps to Transfer to Soil:
- Select the Right Pot: Choose a pot with drainage holes to prevent waterlogging. Aloe vera appreciates well-draining soil, so consider using a cactus or succulent mix.
- Planting the Leaf: Gently place the rooted leaf into the soil, ensuring the roots are covered but the leaf remains above the soil line.
- Watering: Give it a light watering to settle the soil. Be careful not to overwater, as aloe vera is prone to root rot if kept too wet.
This step is like sending your kid off to college—an exciting moment but one that requires careful preparation.
Caring for Your New Aloe Plant
With your aloe vera newly settled in soil, ongoing care is essential to encourage healthy growth. Aloe vera is relatively low-maintenance, but there are some key points to consider.
Steps to Care for Your New Plant:
- Lighting Needs: Place your aloe in a bright spot with indirect sunlight. Too much direct sunlight can scorch the leaves.
- Watering Schedule: Water sparingly, allowing the soil to dry out completely between waterings. Aloe vera thrives in dry conditions.
- Temperature and Humidity: Aloe vera prefers a warm environment with low humidity. Avoid placing it near drafts or heating vents.
Remember, aloe vera is like that friend who enjoys their own company—give it space, and it will flourish beautifully.
Common Mistakes and How to Avoid Them
Even with the best intentions, mistakes can happen. Here are some common pitfalls to watch out for when propagating aloe vera in water, along with tips on how to avoid them.
Common Mistakes:
- Overwatering: This is a big one. Too much water can cause the leaf to rot. Keep the water level low and change it regularly.
- Insufficient Light: Without enough light, your leaf may struggle to grow roots. Ensure your setup receives plenty of indirect sunlight.
- Ignoring Rot: If you notice signs of rot, act quickly by removing the affected leaf and allowing it to dry before reintroducing it to water.
It's all part of the learning process, and each mistake brings you closer to mastering plant care.
Benefits of Propagating Aloe Vera in Water
Why go through the effort of propagating aloe vera in water, you ask? There are several benefits to this approach that make it worthwhile.
Benefits:
- Visual Appeal: Watching roots grow in water is a fascinating process and adds a unique touch to your home decor.
- Space-Saving: Propagating in water requires minimal space, making it ideal for small homes or apartments.
- Low Cost: It's an inexpensive way to expand your plant collection without needing extra pots or soil initially.
Plus, it's a great conversation starter when guests spot your leafy science experiment!
Integrating Aloe Vera into Your Home Design
Beyond its practical uses, aloe vera can play a significant role in enhancing your home decor. Its elegant shape and soothing green color make it a versatile addition to any space.
Design Tips:
- Windowsill Gardens: Line up a few aloe plants of varying sizes for a simple yet striking windowsill garden.
- Desk Companion: A small aloe plant can brighten up your workspace and provides a natural air purifier.
- Bathroom Beauty: Aloe vera thrives in the humidity of a bathroom and adds a touch of greenery to your self-care space.
With its timeless appeal, aloe vera fits seamlessly into any interior style, whether you're into modern minimalism or cozy cottage vibes.
Final Thoughts
Propagating aloe vera in water offers a rewarding way to grow your plant family while enjoying the beauty of nature up close. From selecting the perfect leaf to nurturing it into a new plant, each step is an opportunity to connect with your green thumb.
At Cafe Planta, we believe in nurturing this connection by offering a range of houseplants and plant care accessories. Whether you're a seasoned plant parent or just starting your journey, we're here to help. Should you have any questions, feel free to email us or reach out via Instagram. We're excited to share our love of plants with you!


